
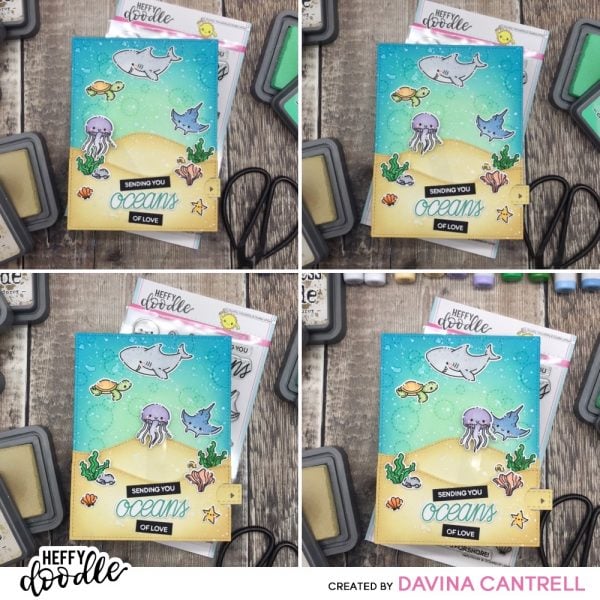
Oceans of Love with Davina

Hello crafty friends! Davina here on the blog sharing an interactive card using all Heffy Doodle products. I make a wonderful under the sea ocean scene, with a pull tab, that creates a waving swing motion. I didn’t come up with this on my own. My friend Vita Thai sent me a card last Christmas, that had a snowball fly across the sky, then posted another swing motion card a few weeks ago employing the same mechanism. But this time she included a photo of the internal parts, and I was able to make my own.
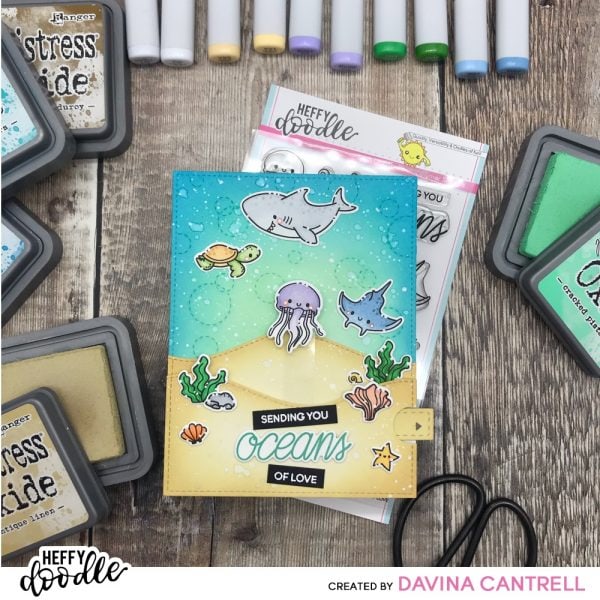
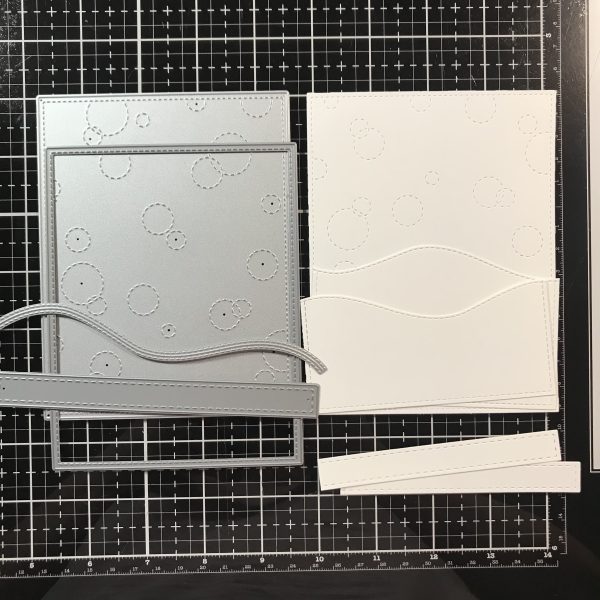
I knew right away that I wanted to create an undersea scene, so I gathered up the super cute Oceans of Love stamps and dies, and the Stitched Bubble cover Plate to sketch up my design. Then, I used the large stitched frame from the Clover Frame Dies to cut a panel from Bristol Smooth Cardstock, and two wavy hills from that using the Slopey Joe Hillsides. I cut a second panel of Bristol Smooth using the Stitched Bubble cover Plate and 2 strips with the Strips of Ease dies.
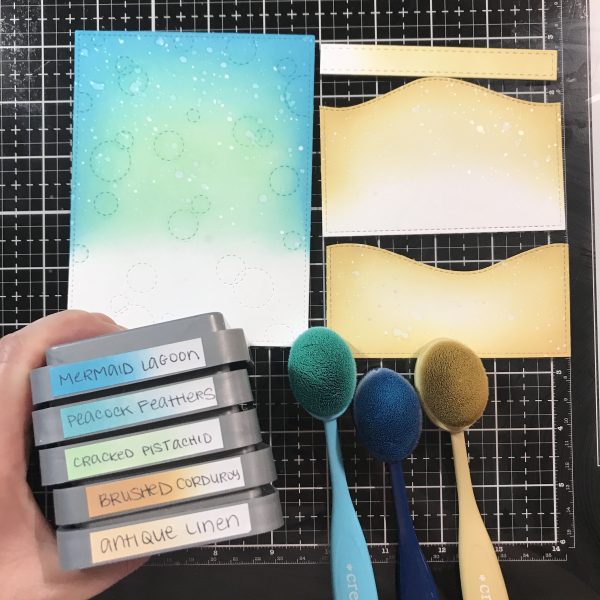
Once I had my Bristol pieces cut and ready, I got busy inking them up using distress oxides. Once my inkblending was completed I splattered with clean water, white ink, and glittery Perfect Pearls. Next, I used liquid glue to attach both strips together to create a single thicker/sturdier pull tab.
I stamped all of my images using my stamp platform and Jet Black Ink, then colored them with copic markers. After die cutting, I added small white dot highlights. I adhered the taller sand layer to the bubbly background, then played with the placement of my images to determine where I would place everyone, and who would move across the scene. Once deciding on the Jelly fish, I adhered the other fish onto the blue background.

Now it was time to recreate the mechanism for the swinging motion. First I chose the location for the pull tab. Making sure it would not be visible above the shorter sand bar. I used a pencil to mark the center of the tab onto the background, then used an old half circle paper punch to punch out the notch. I lined up the short sand bar, and the card base and removed the same area with the punch so my pull tab would be easily accessible. I decided I needed to make a double motion for my Jellyfish. If I simply adhered the clear tab to the image, he would pivot sideways during his motion. I did not want that. I wanted him to remain upright as he floated across the card, so I needed to apply a weight and foam dot.
Here’s what I did…
1. Cut strip of acetate 1/2 inch wide and about 3 1/2 inches long.
2. Center acetate onto back of image and mark where to punch hole. Round edges
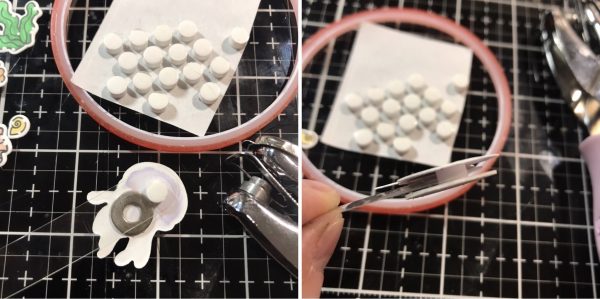
3. Punch hole with standard size hole punch.
4. Adhere washer or coin using 1/8 double stick tape to bottom of image
5. Center acetate strip and apply foam dot, place acetate hole over the foam dot, then cap with a circle of thick cardstock that is smaller than the image. This will create the swinging motion, and hold the image onto to acetate.
Place the image where you want the beginning of the motion. The acetate should extend beyond the pull tab, just far enough to apply a mini brad, in the center of the panel under the tab. (Trim off any extra length of acetate) With a pen or marker make a dot in the center of the acetate where the mini brad will be, and in the center of the pull tab. Also mark the cardstock panel and tab. Use a piercing tool or tiny hole punch to make 4 holes where you marked, connect the bottom of the acetate to the card panel with a mini brad. Connect the pull tab to the acetate in the second hole with a mini brad. Do not go through the card panel with this second brad.
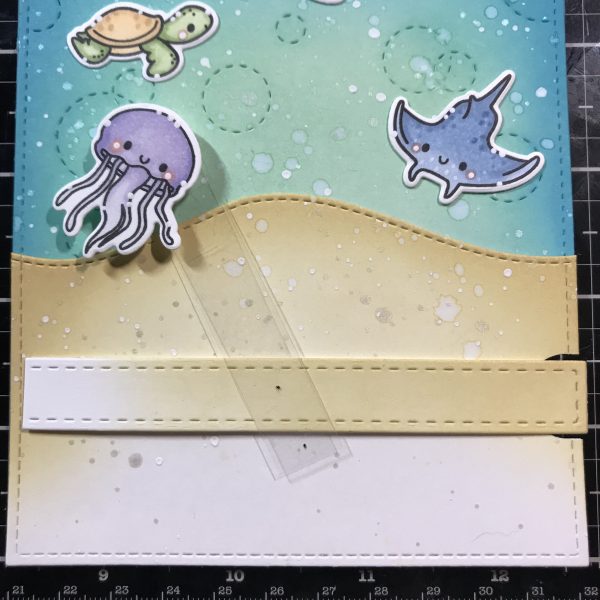
I made a little belly band with a scrap of paper to hold the tab straight, then trimmed the tab to be 1/2 inch from the left when in the resting position. Surround tab with foam tape, making sure it will all be covered by top sand bar. Once the foam tape is in place the mechanism should be fully operating. Make any adjustments before placing top panel.
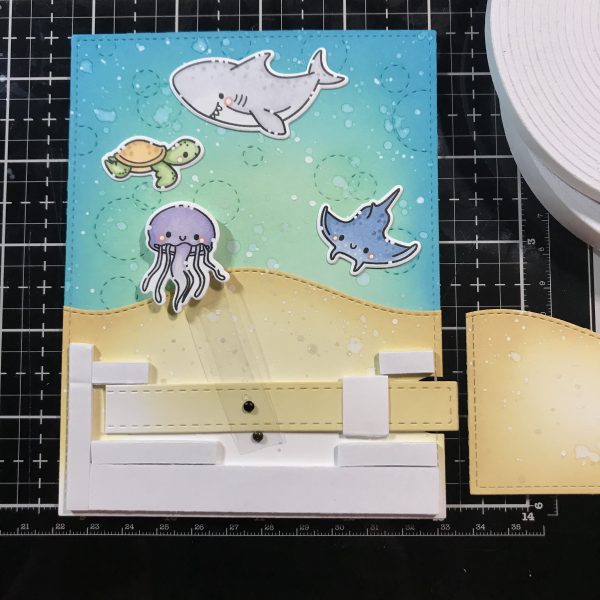 After securing the top sand panel with the foam tape, I adhered the rest of my images, along with my sentiment. Then I played with the tab for ages, and gladly it still works like a champ! And I don’t have to be extra gentle or anything. I’m so happy I took the extra time to make sure the Jellyfish swings. If it was a horizontal otter or dolphin it wouldn’t have been necessary, but since it was this smaller vertical image it really needed to stay upright. This was fun, and didn’t take a terribly long time. Honestly I spent longer coloring than I did matching the mechanism.
I hope you like this and give it a try, I’ll have a little video clip on my Instagram if you want to see it in all of its glory. Thank you for dropping by,
Davina