
“Tooth” Cute Fairy Interactive Card

Hello! Megan here and I am back with my last blog post for Heffy Doodle since my design team term is over at the end of March. I have loved being a part of the Heffy Doodle family and want to thank the whole team for making me feel so welcome. It has been such a wonderful time and experience!
For today’s card I have created an interactive design featuring one of my favorite Heffy Doodle stamp sets, Absotoothly Awesome. I think it is the cutie patootie tooth image that stole my heart, but the whole set is amazing!
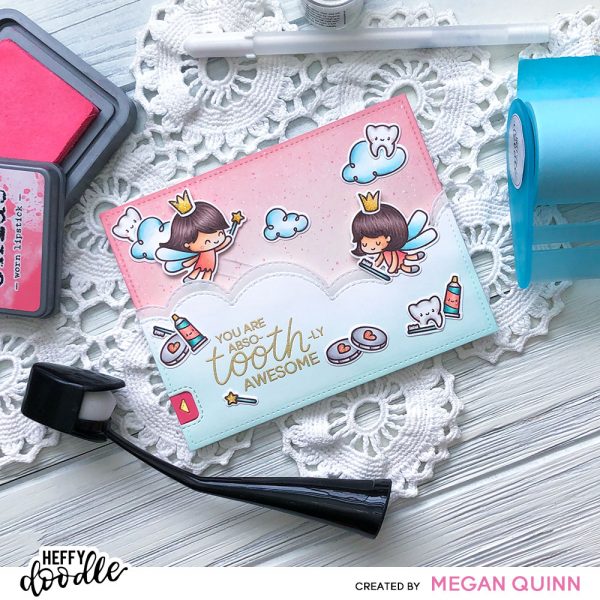
To begin, I stamped images from Absotoothly Awesome and Fluffy Puffy Unicorn onto Alcohol Marker Friendly Cardstock using a hybrid ink. I then colored them in using Copic Markers and die cut them out using the coordinating dies.
Next, I die cut a piece of Bristol Smooth Cardstock using the largest die from the Imperial Stitched Rectangles Dies. I ink blended the panel using Distress Oxide Inks in Tattered Rose and Worn Lipstick with a blending brush. For a bit of texture, I flicked on Worn Lipstick, Copic White, and gold Gansai Tambi watercolor on using a small paintbrush.
I used the Swish ‘n Pop Die Set from Lawn Fawn to make the card interactive. It is very easy to assemble and creates a really cool motion across the front of the card. (Lawn Fawn has a great introduction video on YouTube that explains how to use this set perfectly that I will link here.) To make the fairy fly from the right side of the card, I used the die meant to cut the holes on the card base and die cut it from the backside of the front panel on the left hand side. I also used the reverse side of the acetate piece as well.
For the cloud section, I die cut a piece of smooth white cardstock using the largest die in the Imperial Stitched Rectangles Dies. Then, I lined up one of the cloud dies from the Silver Linings Cloud Border Dies on that panel, making sure to cut it high enough to cover the interactive mechanism underneath. I repeated this process to die cut some pearlescent vellum that I used to layer behind the white cloud. Using a soft blue die ink, I ink blended to lower section using an ink blending brush.
For the sentiment, I used the Absotoothly Awesome stamp set. I stamped it using Versamark ink and heat embossed it with gold embossing powder. I then adhered the two cloud layers together using Tape Runner.
I used foam tape to adhere the cloud section to the card base, being mindful not to place any tape where it would interfere with the movement of the interactive mechanism. For the images, I used liquid glue to stick them down. As a finishing touch, I added Nuvo Crystal Drops in Moonstone to the tips of the fairy wands, crowns, and top edge of the white cloud section.
I hope that you have enjoyed seeing this Tooth Fairy inspired card! Thank you so much for visiting the Heffy Doodle Blog today! Bye!
Megan