
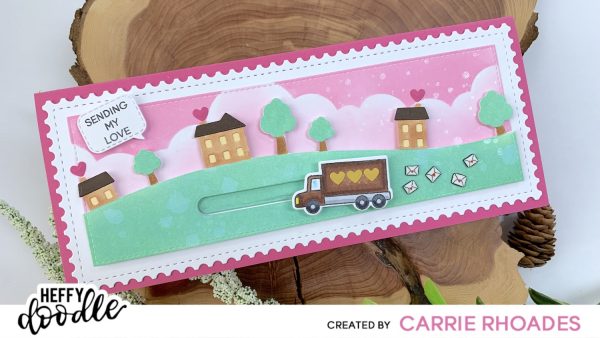
Little Town Interactive Slimline Card
Hello stamping friends, Carrie Rhoades here today sharing an interactive card featuring the Little Town Border Dies.
I love simple die sets like this one that can be paired with images that I already have and bring them new life. The Little Town Border die set is one of those sets and makes a great backdrop for so many cute scenes.
For my scene I wanted to have a delivery truck rolling by delivering happy mail.
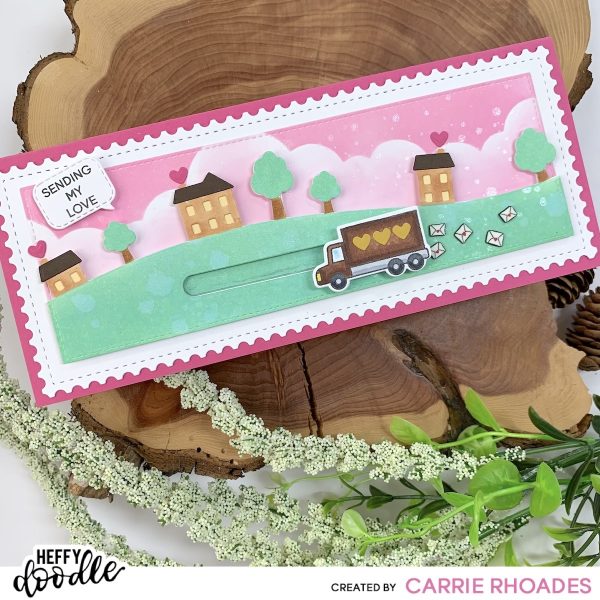
This speedy delivery truck is out working hard delivery packages and happy mail in this little town. And when you move the card the truck slides to the other side for a fun interactive element.
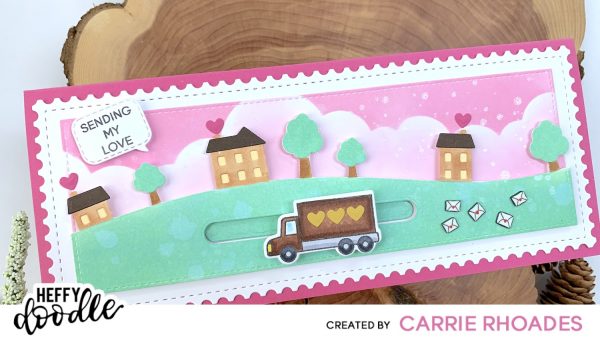
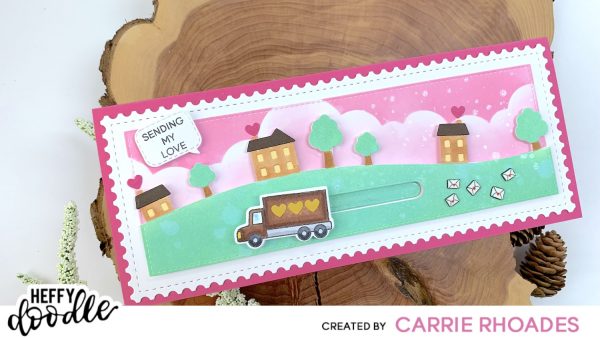
I started off this card creating the background, which is the pink cloudy sky. This panel was cut using the smallest stitched rectangle from the Stitched Slimline Trio die set. I added the clouds to this white panel using Kitch Flamingo Distress Oxide ink and the Cloudy Skies Stencil. I cut my stencil apart so instead of inserting my smaller card into the stencil I can use the pieces on any size card. I only did one row of clouds and then I softened the white area under the clouds with the left over ink on my blending tool. I then added a bit of sparkle by splattering on some Perfect Pearls. I set that aside to dry and die cut a second rectangle with the same stitched die that I then die cut using the Little Town Border die from white card stock. To get the green grass covered up each house and tree using Heffy Tape. Then I added Cracked Pistachio Distress Oxide ink to make the grass this minty shade of green. I splattered this with water and also Perfect Pearls. After removing the Heffy Tape I then colored in the houses and tree with E33 and E35 COPIC Markers. Then it was time to die cut the opening for the slider, which I did using the largest die from the Straight Sliders Die set. I made sure to save the piece that die cuts out, to add back in, so when all finished the area behind the slider is not pink or white from the background, but green to match the grass.
The Little Town Border die set comes with extra dies that cut out roof tops, pieces to go behind the houses for the lights and tree tops. I die cut the roof tops from dark brown card stock, the behind pieces from a light yellow card stock and the tree tops from a scrap piece of card stock that I ink blended with the Cracked Pistachio ink, so they would match the grass. Then it was time to get my truck ready. This cute little truck is from the Home Sweet Home stamp set, which is a great stamp set for someone who is moving or just moved in. I used to make card for a new home owner that resembled the “Up” house, you can check that out right here if you like. I colored in this delivery truck to look like one that frequents my house that is also brown and yellow. The tiny die cut hearts on the truck and above the houses are from the same die set that the postage looking panel is from; Slimline Mini Mail die set. I love the postage stamp feel of that die cut! And you can always use a tiny die cut heart! They were such a cute touch for this card.
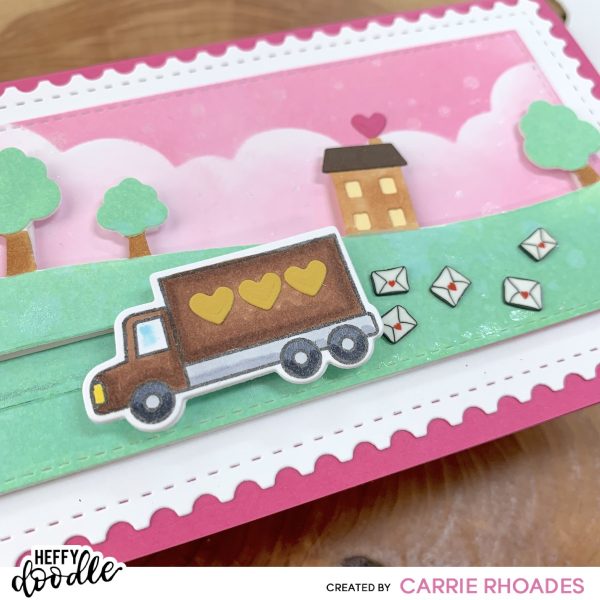
I had some little clay elements that are envelopes that I thought would be fun to have behind the truck, like the blew out. Although, the thought of lost mail does make me very sad.
If you have never made a slider before it is easier than it seems. To get the truck to move along the track you put a penny behind the track a strip of foam tape on the penny and stick the truck (or sliding image) to the foam tape. To make my truck a bit sturdier I added two additional die cuts to the back of it, but this is not necessary. It is also helpful to use an anti-static powder on the track incase your foam tape has any residual stickiness on the edges. And the sliding panel needs to be attached to the card with foam tape, giving the space needed for the penny to slide. Take care when applying the foam tape, so that it doe not get too close to the penny and stop it from sliding.
I added a cute little sentiment from the Whatcha Sayin’ stamp and die set. I love talk bubbles and this was the perfect sentiment for my card.
To finish off this card I mounted it to a dark pink card base that is 8-1/2″ x 7″, scored at 3″.
Below you will find all the supplies I used to make this card.
Thank you so much for stopping by! I hope you find time to stamp today!
Happy Stamping
Carrie Rhoades
You can also find me in all my social media hang outs right HERE.